Sealant/infiltration
No caries removal and seal with a sealant (or infiltration)
Suitable for:
- a primary tooth with an initial occlusal or proximal lesion
- a permanent tooth with an initial occlusal or proximal lesion
- a permanent tooth with a moderate occlusal or proximal lesion
- a permanent anterior tooth with an initial lesion
Aim: To completely seal a carious lesion from the oral environment to slow or even arrest caries progression.
The evidence that this approach can be effective for initial lesions is mainly for permanent teeth.68,85,86 For moderate lesions, the evidence relates primarily to occlusal dentinal caries.81 No local anaesthesia, tooth preparation or caries removal is used and there is no risk of iatrogenic damage to adjacent teeth. This less invasive approach may be more technically feasible and acceptable in some situations, but it should be noted that regular surveillance of the sealant is required. If the seal fails, caries will progress.
Technique for occlusal surface
Place a fissure sealant over pit or fissure caries, to completely seal the fissure (see Resin fissure sealant).
If using this approach on a pre-cooperative child, consider using the press finger technique with a glass ionomer material as a temporary measure (see Glass ionomer sealant).
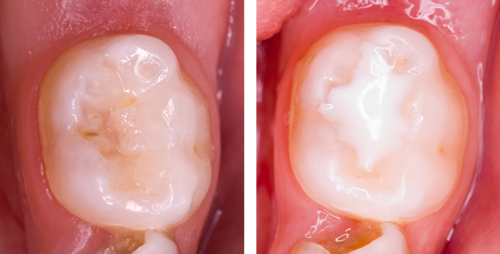
Images show a noncavitated carious lesion before (left) and after (right) fissure sealing
Where there is early cavitation, a filled resin such as flowable composite is more suitable than an unfilled resin to resist occlusal forces.
Technique for proximal surface
Separate the teeth. This can be done using orthodontic separators which are left in place for 2-5 days or with progressive wedging apart of the teeth at the appointment. Topical anaesthetic may be required.
Isolate the teeth (ideally with rubber dam).
Protect the adjacent tooth which is not to be etched by placing a matrix strip against it.
Etch the surface of tooth and rinse well.
Place a fresh, dry matrix strip and apply the resin sealant to the tooth surface to be sealed.
Check there is no excess pooling around the gingivae.
Light cure and use floss to check the contact area.
Technique for proximal surface using resin infiltration (Icon®)
An alternative method for placing resin infiltrations into proximal enamel lesions to stop the demineralisation from progressing is to use a specially designed kit (Icon®). This involves isolating the tooth, etching, using ethanol to dry out the pores that have been created and then flowing unfilled, low viscosity resin into the pores, blocking them.
Clean the teeth with toothbrush or prophy brush/cup with pumice/prophy paste. Wash and dry the tooth.
Place an interdental wedge to create an interdental space.
Place Icon-Etch syringe (green side towards tooth) between teeth, apply etch. Leave 2 minutes.
Remove syringe and dry for 30 seconds.
Use Icon-Dry for 30 seconds and dry.
Place Icon-Infiltration syringe between teeth. Apply material and leave for 3 minutes.
Remove application syringe, remove excess material with floss and light cure for 40 seconds.
Repeat the last two steps.
Remove wedge and polish if necessary with a polishing strip.
Technique for anterior surface using resin infiltration (Icon®)
Resin infiltration could be used essentially as above, but important considerations include:
- time and cost involved
- need for stable oral hygiene
- quality of life
- needs to be accompanied by enhanced prevention
- other treatment needs
Aftercare
For all sealants, use radiography to monitor if the lesion is progressing at intervals informed by caries risk assessment.
For occlusal sealants, check the integrity of the sealant with a probe at each recall visit.
When an occlusal fissure sealant that has been applied over a carious lesion has worn enough to expose some parts of the fissure system, apply a fresh fissure sealant.